
- Log into and visit your website dashboard.
- Go to Posts on the left navigation menu.
- Click on “Add New“.
- Enter a title by typing it in the box at the top that says, “Add title”.
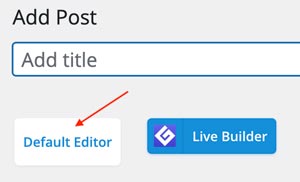
- Click the Default Editor button to switch the content area to the standard layout. Then start typing your post content in the main article area.
- Click Publish when you are done creating your post.

Optional and Highly Recommended
- Add a Featured Image by clicking Set featured image in the righthand column. Then upload your image.
- Assign a Category or multiple categories. Categories help group your blog articles into related subjects. Use the Categories box in the righthand column to assign a current category, or create a new category.
Quick method to create a new blog post
Log into your website. In the black admin bar at the top of the screen, hover over +New, then click Post.

This will take you to the add new post screen from anywhere on your website while on either the frontend or backend of the website. Proceed to follow steps 1-6 above to create your new blog post.